
Arduino RFID Access Controller
Arduino MFRC522 Access Controller
We are currently running a combo deal on the components used in this project so if you're interested in building your own access controller this deal might just be for you.
Ingredients

Hardware Setup
Remove the proto shield from the bag and stick the breadboard to the PCB;

Connect the proto shield to the Arduino Uno;

Next we remove the RFID from the bag and we solder the right angle connector to the PCB;

Next we wire the proto shield as follow;

Take note there is 5V and ground connections on the side of the proto shield that is very handy, I also used them to wire the relay.
After doing the wiring insert the RFID as follow;

Effectively we are wiring the boards as follow;

Also connect the relay as follow;


Handy RGB Feedback
This is not a must but it is a nice feedback, so you can add RGB LED Module, there is also a SMD version of this module, both these modules can also be found in our sensor kit. The wiring for LED will be as follow;

Software Setup
Before continuing do ensure you have done the necessary installation of software as per our setup blog.
After completing the setup of all you IDE software it is time to install the MFRC522 driver.
Navigate to "Tools->Manage Libraries"
Type "RFID" in the search bar;

Click the "MFRC522" Library and then click "Install"
Your library is now installed and you are good to go......
Now navigate to "File->Examples->MFRC522->Access Control"

Go to the following code line;
#define relay 4 // Set Relay Pin
Change it to
#define relay 2 // Set Relay Pin
Now it's time to upload the code to the Arduino
After uploading the code to the Arduino open the Serial Monitor;
Navigate to "Tools->Serial Monitor"
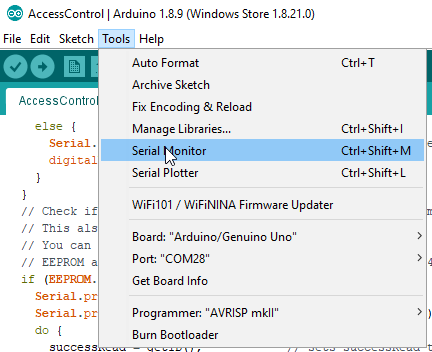
You should see the following;

Now scan the blue tag to set it as the master;
Scanned PICC's UID:
3BAED8D
Master Card Defined
-------------------
Master Card's UID
3BAED8D
-------------------
Everything is ready
Waiting PICCs to be scanned
This blue tag is now the master tag and is used to add or remove tags.
Now scan the white ID tag and you should see the following;
Scanned PICC's UID:
84326B13
You shall not pass
Lets scan the blue tag to put it in programming mode;
Scanned PICC's UID:
3BAED8D
Hello Master - Entered Program Mode
I have 0 record(s) on EEPROM
Scan a PICC to ADD or REMOVE to EEPROM
Scan Master Card again to Exit Program Mode
-----------------------------
Now scan the White ID tag to program it into the system
Scanned PICC's UID:
84326B13
I do not know this PICC, adding...
Succesfully added ID record to EEPROM
-----------------------------
Scan a PICC to ADD or REMOVE to EEPROM
Now scan the blue tag again to exit programming mode;
Scanned PICC's UID:
3BAED8D
Master Card Scanned
Exiting Program Mode
-----------------------------
Now scan the white card and see what happens;
Scanned PICC's UID:
84326B13
Welcome, You shall pass
Checkout the video of the system up and running;
https://www.facebook.com/jvzsourcing/videos/2186898924764732/